Table of Contents
Interface overview
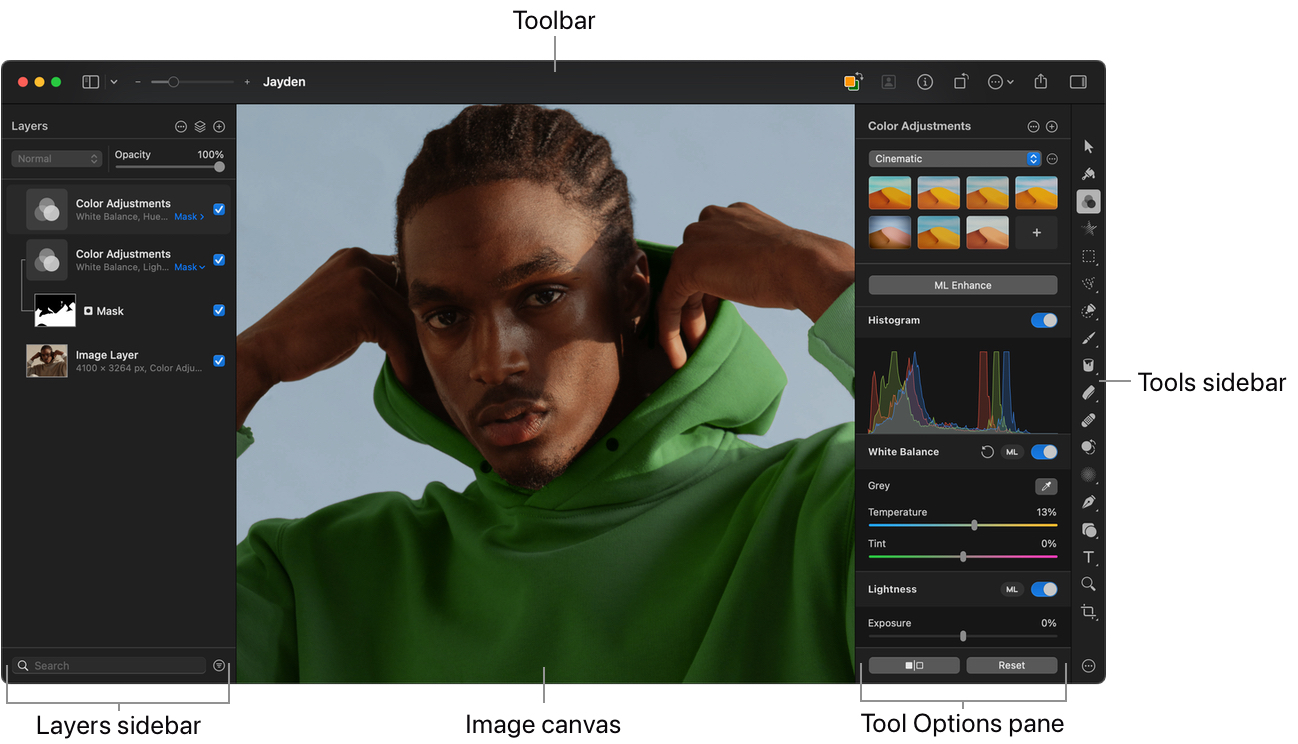
Pixelmator Pro features a single-window, easy-to-use interface, designed for editing images and creating graphic designs. The main parts of the interface are the image canvas in the center, the Tools sidebar on the right, the Layers sidebar on the left, and the toolbar at the top. You can also customize the default layout of Pixelmator Pro to arrange the interface elements differently. See Change the Pixelmator Pro layout to learn more.
There are also additional elements such as overlays or rulers that are hidden by default. You can choose to view them if you need them from the View menu at the top of your screen.
Tools sidebar
The Tools sidebar contains the tools you need to create graphic designs, draw, or enhance the look of images. The default set of Pixelmator Pro tools is conveniently arranged based on their function. You can find groups of tools for making selections, painting and erasing, retouching, and more.
You can also customize the Tools sidebar to create a toolset for your specific editing style.

Some tools in the Tools sidebar are grouped with one or a few other tools. To select a different tool from a group, click the grouped tool twice, force click, or – click it. For more information about the different tools and their functions, see Pixelmator Pro tools.
Show or hide the Tools sidebar
Do one of the following:
- Choose View > Show (or Hide) Tools (from the View menu at the top of your screen).
- Click
 in the toolbar.
 - Press + on your keyboard.
To temporarily show or hide the tool names (in vertical sidebar mode), press + on your keyboard.
Tool Options pane
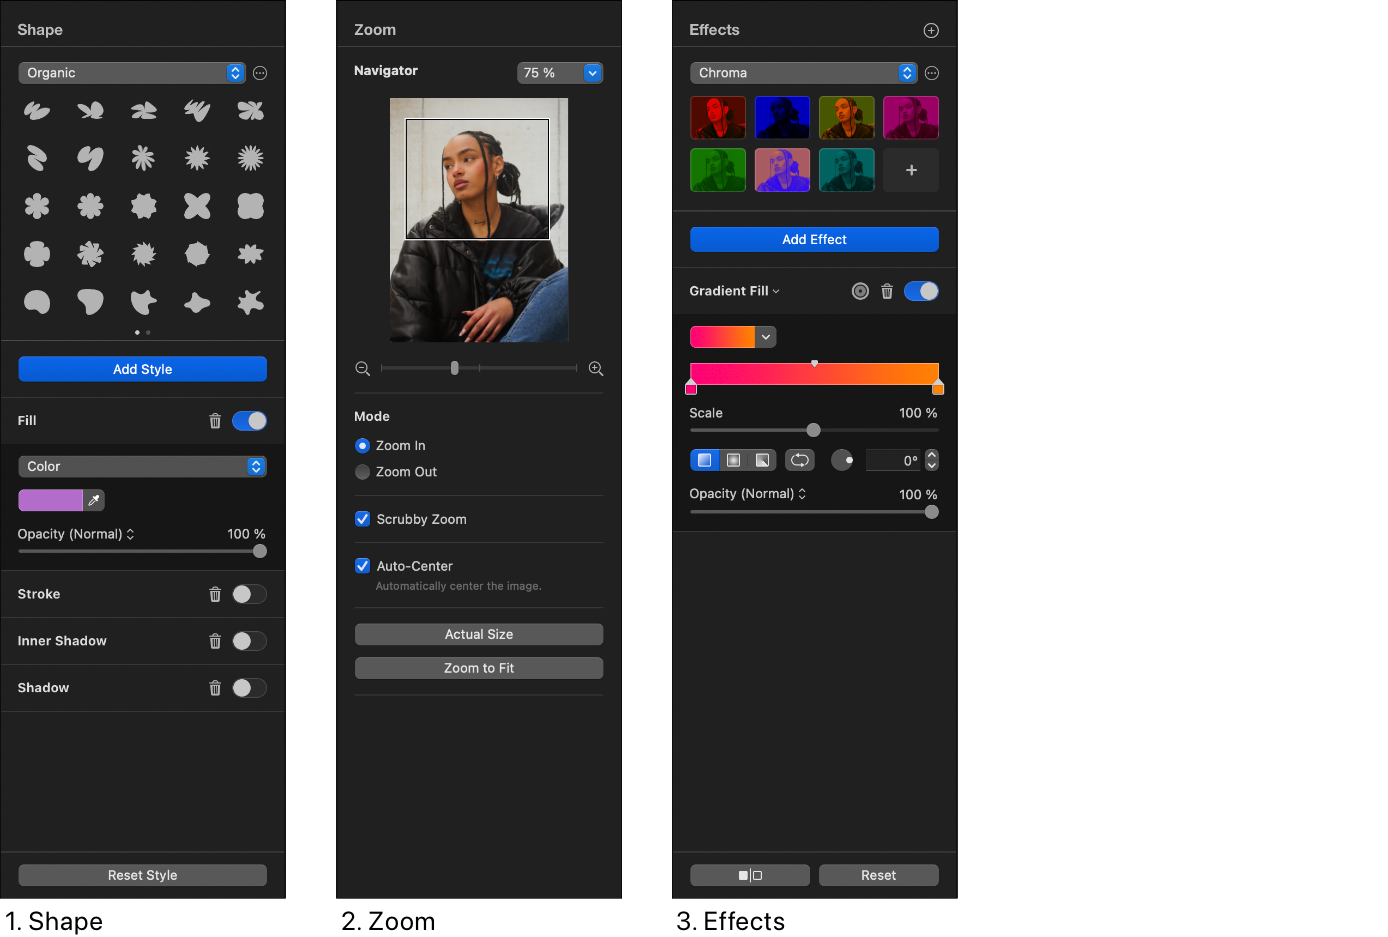
The Tool Options pane is where you customize the Pixelmator Pro tools, effects, and manage presets. If you're using Pixelmator Pro for the first time, the Tool Options pane will automatically appear once you select a tool from the Tools sidebar. The options in the Tool Options pane change when you select different tools. Below you can see a few examples of the various Tool Options views:
On smaller displays, you may need to scroll down to see all the options.
Show or hide the Tool Options
- Choose View > Show (or Hide) Tool Options (from the View menu at the top of your screen).
Toolbar
The toolbar at the top of the application window gives you quick access to the tools and options which affect the entire document rather than a specific layer. Toolbar options include the zoom slider, document information, Quick Export, Share, and more.
You can – click the toolbar and choose Customize Toolbar to add, remove or rearrange the toolbar items. The default set of toolbar items is shown below (available on macOS Big Sur and later).

Click
 to quickly show or hide layers, or the disclosure arrow next to it to show or hide other elements — tools, tool options, presets, rulers, guides, grid, the document Info bar — while creating an image.
 Drag the zoom slider to zoom in or out of your image. Double-click the zoom slider to fill the entire work area with the image.
Click the title at the top of the Pixelmator Pro document window to give your document a new name, change its location, or add tags.
Click
 to open the Pixelmator Pro color picker or drag from the color well onto the canvas to fill a layer, text, shape, or selection with the currently selected color (available on macOS Big Sur and later).
Click Remove Background to clear the background of a photo and replace it with something else or save the image with a transparent background. See Remove layer background to learn more.
Click
 to view document info (document type, size, and other properties), add a description or keywords.
Click
 to rotate the image or video to the left. Press and hold the key to rotate the image to the right.
Click
 to access various document properties, including the image and canvas sizes, Color Depth, and Color Profile. Here, you’ll also find tools such as
Super Resolution and
Trim.
to access various document properties, including the image and canvas sizes, Color Depth, and Color Profile. Here, you’ll also find tools such as
Super Resolution and
Trim.Click
 to use the Quick Export options, add an edited image or video to Photos, Notes, send it through AirDrop, and more.
Click
to hide or show the Tools sidebar.
Show or hide the Toolbar
Do one of the following:
- Choose Window > Show (or Hide) Toolbar (from the Window menu at the top of your screen).
- Press + + on your keyboard.
Layers sidebar
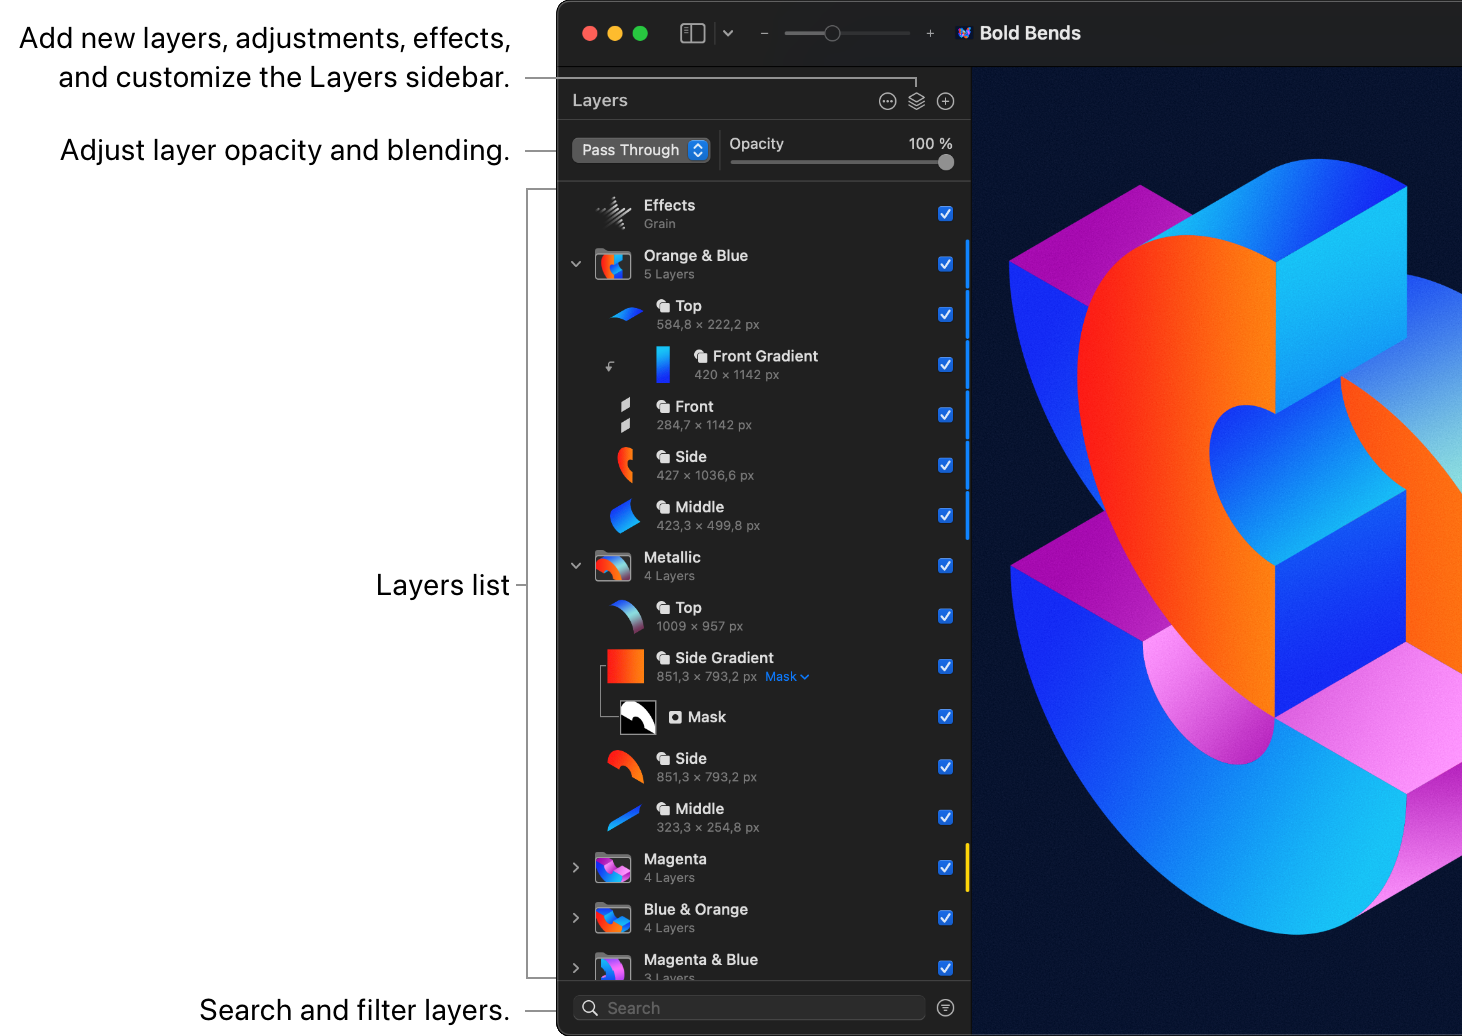
The Layers sidebar is one of the most essential parts of the Pixelmator Pro workspace. The Layers sidebar lets you view and select the different levels of a project you're working on, add new layers, manage layer visibility, and lots more.
Layers list
In the layers list, you can see a visual layout of your entire project — each thumbnail represents a separate element in your composition or, in other words, a layer. You can give layers unique names, change the size of the layer thumbnails, or choose to list thumbnails along with certain layer properties. It’s also possible to hide the Layers sidebar completely if you're not using layers in your project.
At the top of the Layers sidebar, click ![]() and customize the Viewing Options for the layers list:
and customize the Viewing Options for the layers list:
- Size. Choose between three different thumbnail sizes: small, medium, and large.
- Show layer descriptions. Select this option to see additional layer properties when editing, such as layer size, type, or edits applied.
Learn more about working with layers
Layer opacity
You can adjust how transparent or opaque the layers should be using the Opacity setting. Drag the Opacity slider or click the percentage field to enter a custom value.
Learn more about layer opacity
Layer blending
Blend modes let you change the look of layers by mixing and combining layer colors. Select a layer, choose a blend mode, and the colors of the selected layer will blend with the layers underneath it. Using different blend modes, you can achieve some unique-looking artistic effects, improve image retouching workflows, and more.
Learn more about layer blending
You can also customize where the blend mode and opacity controls will appear in the Layers sidebar. Click ![]() at the top of the Layers sidebar and customize the Viewing Options for the layers list:
at the top of the Layers sidebar and customize the Viewing Options for the layers list:
- Blending position. Select Top to pin the blend modes and opacity to the top of the Layers sidebar or Bottom, to pin them to the bottom.
Search and filter layers
You can search your document for specific layers by typing their name into the search field at the bottom of the Layers sidebar. The filter search can also help sort layers based on their type (images, shapes, text, RAW images, groups, masks, color adjustments, effects, videos) or tags.
Learn more about managing layers
Show or hide the Layers sidebar
Do one of the following:
- Click
 in the toolbar.
 - Choose View > Show (or Hide) Layers (from the View menu at the top of your screen).
- Press + on your keyboard.
Tab bar
The Tab bar lets you easily switch between documents if you have more than one open at a time.
Pixelmator Pro opens documents in tabs by default but if you'd like to have a document in a separate window, you can drag any tab from the Tab bar to detach it.
Also, if you'd like to see the previews of the documents in tabs, choose Window > Show Tab Overview (from the Window menu at the top of your screen).
Tip: You can create new empty images or open pre-designed templates and mockups from the Tab bar. Click
![]() on the right of the Tab bar to do so.
on the right of the Tab bar to do so.
Show or hide the Tab bar:
- Choose Window > Show (or Hide) Tab Bar (from the Window menu at the top of your screen).
Image canvas
The front and center of the Pixelmator Pro window is the image canvas. It’s your main working area and a place where any photos, shapes or text you add will appear.
You can zoom in and out of the canvas, pan it in any direction while zoomed in, and scroll beyond the edges of the canvas.
If you’re mainly working with projects created from scratch, you can choose whether you want to start every new document with a white, black or transparent image canvas. Go to Pixelmator Pro settings to choose the background type you want.
Tip: In Pixelmator Pro, you can hide all the elements of the interface except the image canvas. Choose View > Hide Interface (from the View menu at the top of your screen) or press + on your keyboard to do so.
Rulers
Rulers help to accurately arrange and size layers on the canvas. When rulers are turned on, they appear at the top and the left side of the document window. Special markers on both rulers indicate your pointer’s exact position as you move it along the working area.
Rulers almost always come hand in hand with guides — another great tool to help arrange objects on a canvas more precisely. Add guides by clicking and dragging the arrow from the ruler onto the canvas.
Note: Rulers in new documents will be turned on automatically, if a document before it had Rulers activated.
For more information about guides and rulers, see Use rulers and Use alignment guides.
Show or hide Rulers
Do one of the following:
- Choose View > Show (or Hide) Rulers (from the View menu at the top of your screen).
- Click the disclosure arrow next to the item in the toolbar, then choose Show (or Hide) Rulers.
- Press + on your keyboard.
Overlays
Overlays are non-printing elements such as the grid, layer handles, or active selections that show up on an image but are not part of it themselves.
Show or hide all overlays
Do one of the following:
- Choose View > Hide Overlay or View > Show Overlay (from the View menu at the top of your screen).
- Press + + on your keyboard.
Show or hide specific overlays
Do one of the following:
- Choose View > Overlays.
- In the Overlays submenu, select or deselect one of the following:
- Guides: Shows or hides persistent guides on the canvas.
- Grid: Shows or hides a custom grid.
- Pixel Grid: Shows or hides a pixel grid on the canvas (visible when zoomed in close on an image).
- Shape Outline: Shows or hides outlines of shapes (useful when working with combined shapes).
- Layer and Selection Handles: Shows or hides square white selection handles around layers when they are selected.
- Quick Canvas Controls: Shows or hides media placeholder or alternative element group buttons on the canvas.
Tip: To enable shape outlines, you can also – click any shape on the canvas and choose Show Shape Outline from the menu that appears.
Info bar
The Info bar provides useful information about the image or a selected layer. That includes properties such as the RGB color values (1), cursor position (2), layer dimensions (3), position change (4), starting position (5), angle (6), color profile (7), color depth (8), and image dimensions (9).

Tip: You can – click the Info bar to add or remove certain properties.
The Info bar also offers quick access to Image Size, Color Profile, and Color Depth settings. Double-click the desired setting in the Info bar to open a dedicated edit sheet.
Show or hide the Info bar
Do one of the following:
- Click View > Show (or Hide) Info Bar (from the View menu at the top of your screen).
- Click the disclosure arrow next to the item in the toolbar, then choose Show (or hide) Info Bar.
- Press + Forward Slash on your keyboard.


