Big picture, is transparent a color? Hex? I mean, zero opacity.
Hey all. In my project I need to replace all instances of black with transparent.
I'm not making a background transparent. I know how to do that with layers.
I tried replace color but it doesn't allow transparent as a replacement choice. Or does it?
Thanks in advance.
Bill
Replace a particular color with transparent
2018-08-24 16:31:19

2018-08-24 18:49:34
Hi Bill.
You're right about replace colour. That won't affect transparency. There are a couple of methods you can use, though. Both may need some tidying up afterward depending on the complexity of your image.
Method 1 - If you can select it you can mask it.
1. Using your favourite selection tools, select everything but the black (or select the black and invert the selection).
2. Use Layer > Add Layer Mask to mask out the black (or right-click on the layer and Add Mask).
(alternatively if you're feeling cavalier, select the black and hit delete).
(Tip. You can move easily between selections and masks. To make a Mask from a selection, just Add Mask to a layer that doesn't have one. To make a selection from a mask, click on the mask and select Load Selection from the edit menu.)
Method 2 - Clipping masks for the win.
1. Create a copy of your layer.
2. With the copy selected and visible, use the Stylize > Threshold effect to make the bits you want white and the bits you don't want black.
3. Use the Other > Mask to Alpha to use the brightness of the image as opacity information.
4. Move this layer underneath the original.
5. Right click on the original and select Create Clipping Mask. This will apply the opacity information of the lower layer to the colour information of the upper.
I've assumed you're using Pixelmator 3.7.x for these tips, though they should work with earlier versions. If you're using Pixelmator Pro only Method 1 will apply (and menu items will be in different places).
Hope this helps. Let me know if you get stuck and post an image if you do. It'll be easier to show you either of those methods with your own image.
- Stef.
2018-08-24 19:02:29
Hey st3f, thanks for reply.
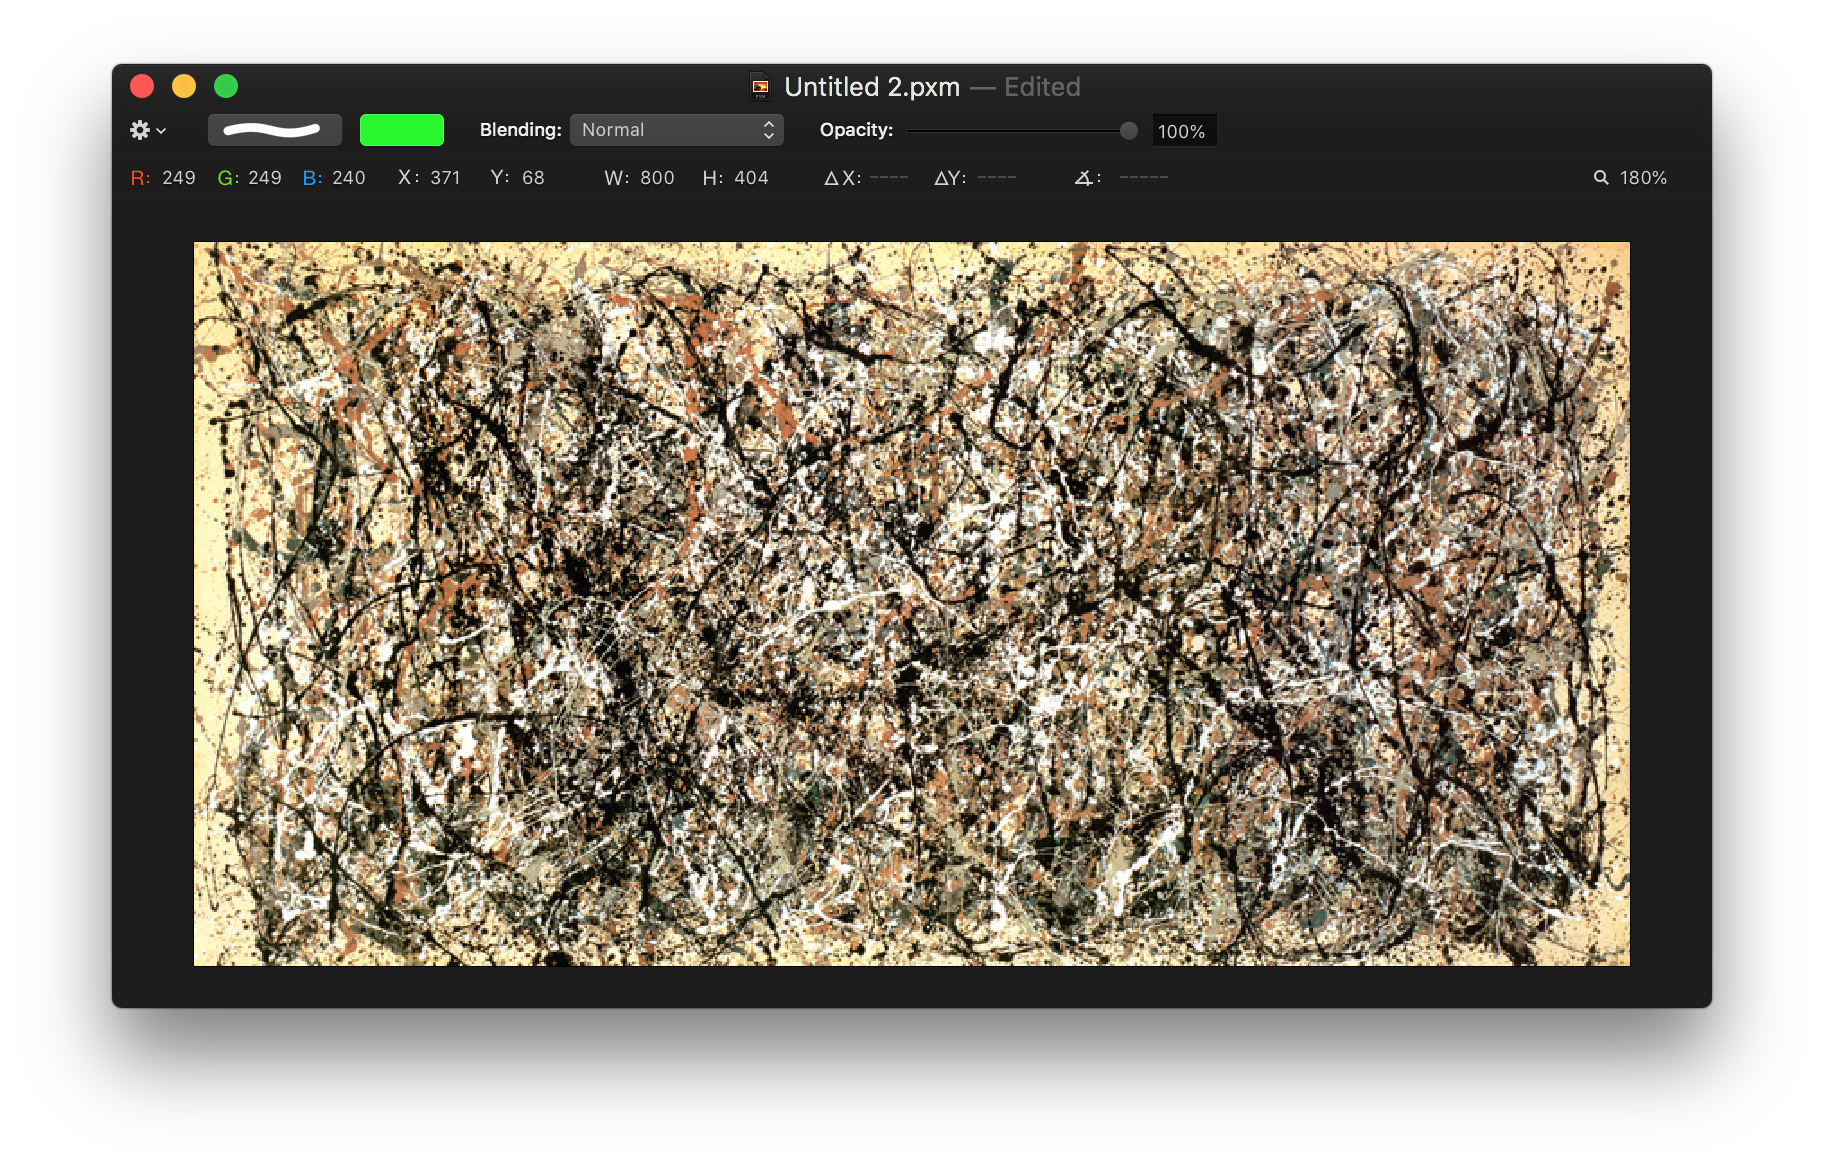
Think of a Jackson Pollack with 10,000 pixels of black and the other 100,000 pixels are different colors. How would you select just the 10,000 black pixels if you want to turn them all transparent?
So, not sure how to even attempt method 1 or 2. I'm sure I'm just not getting something. I have too many black pixels that are too spread out to select them all individually.
It would be cool to just be able to manipulate the underlying HEX code. IF pixel = #000000 THEN change pixel to TRANSPARENT HEX.
Bill
2018-08-24 19:24:35
Jackson Pollock? Method 2. Definitely method 2. 
It's not as complex as it sounds. Trust me.
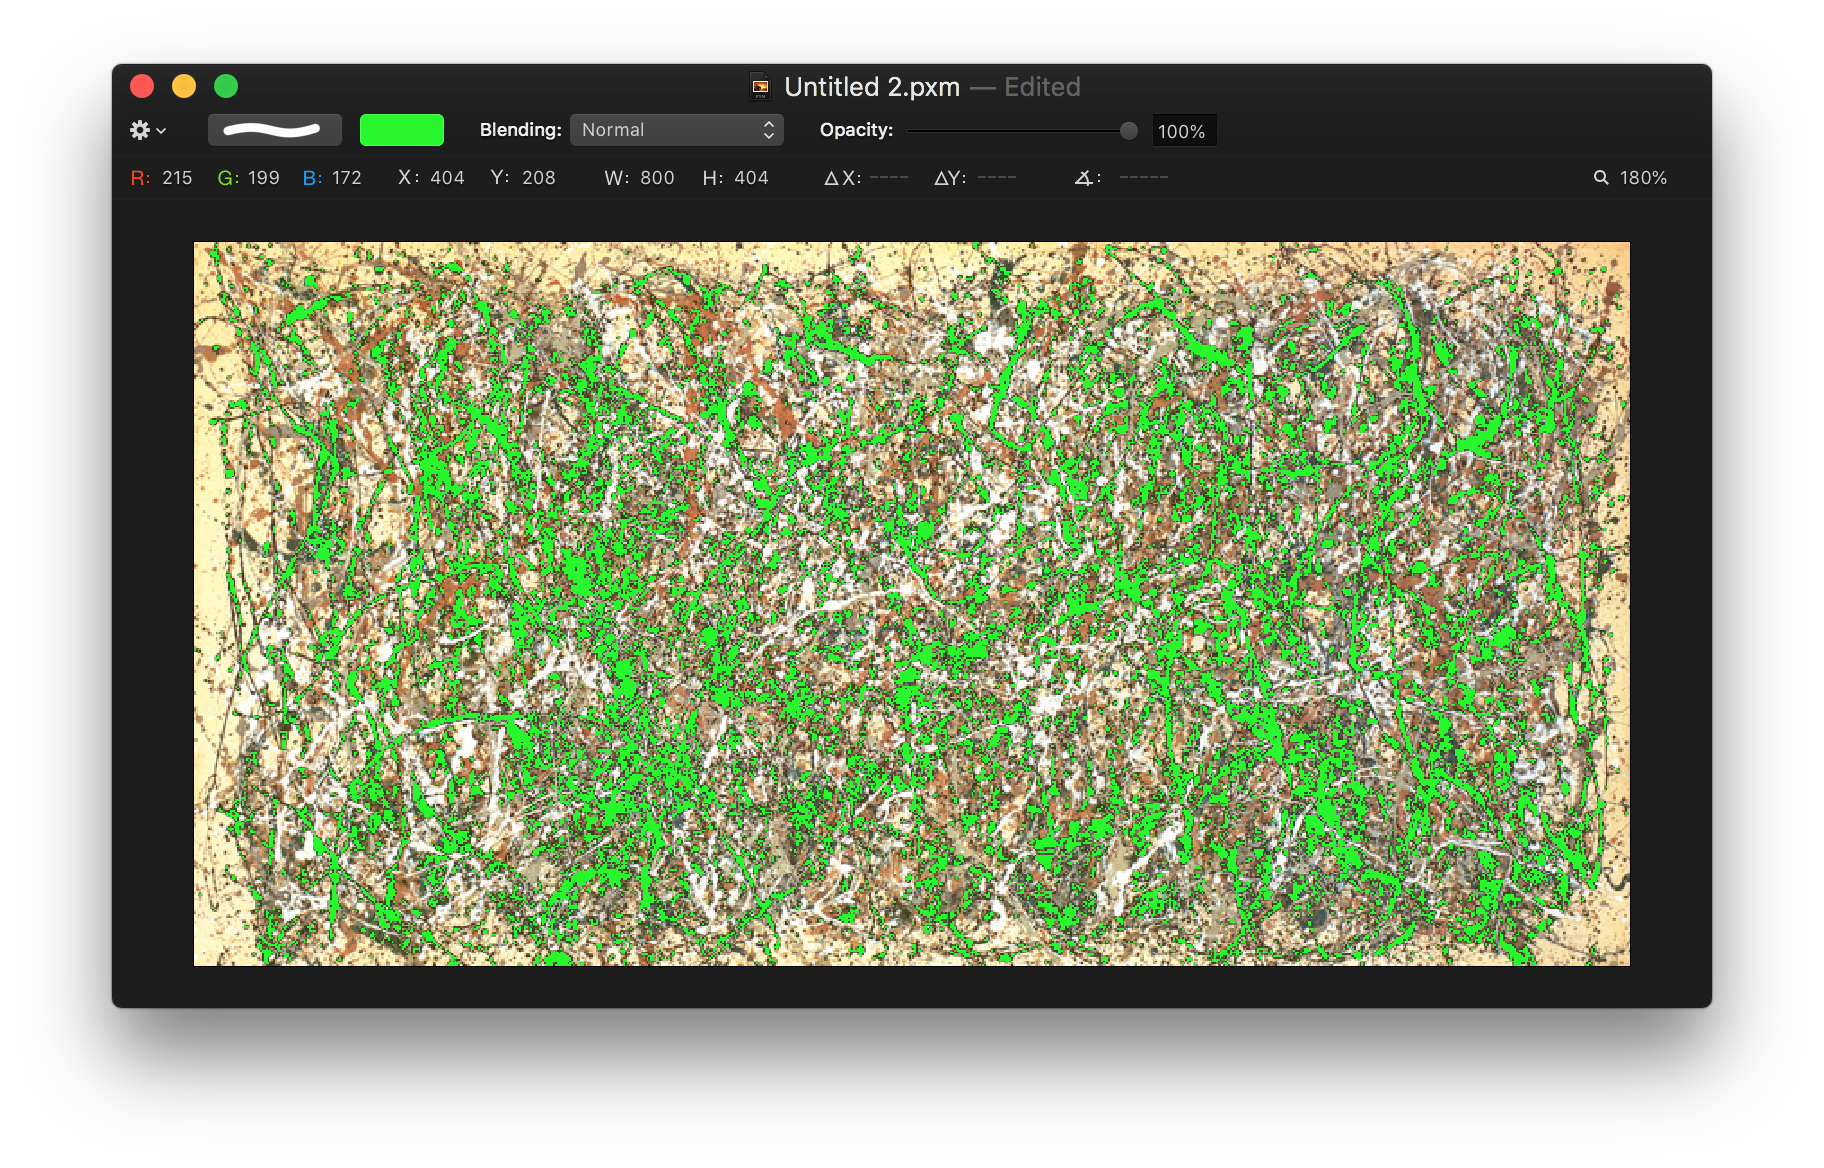
This might convince you. Jackson Pollock:
Jackson Pollock with transparent black and a hideous vibrant green showing through from below.
It may not be exactly what you wanted but here's hoping it's close enough.
(edit: If you want direct control of your pixels and can code in Java, JavaScript, or Python, you might want to have a look at processing.org. It's a simple self-contained IDE/language that can interact with images natively without loading any libraries. Might be overkill to learn just to edit one image, though. )
It's not as complex as it sounds. Trust me.
This might convince you. Jackson Pollock:

Jackson Pollock with transparent black and a hideous vibrant green showing through from below.

It may not be exactly what you wanted but here's hoping it's close enough.
(edit: If you want direct control of your pixels and can code in Java, JavaScript, or Python, you might want to have a look at processing.org. It's a simple self-contained IDE/language that can interact with images natively without loading any libraries. Might be overkill to learn just to edit one image, though.
2018-08-24 21:38:05
Hey st3f,
Got method 2 to work. I just DO NOT know or understand Pixelmator nomenclature. Also got the layers reversed
Got method 2 to work. I just DO NOT know or understand Pixelmator nomenclature. Also got the layers reversed
2018-08-25 06:31:51
Yay. Glad to hear it worked.
Me too. Every. Single. Time.Also got the layers reversed.
2020-01-08 10:45:12
Hi All,
I had the same question as Bill, but I am using Pixelmator Pro (Version 1.5.4 "Avalon") and just like Bill, I didn't even know where to start with Stef's suggested methods 1 or 2, especially because I am using the later version of the software.
I refused to believe that such a great app as Pixelmator does not have an easy way to do this, so I did poke around a little bit and found out that it is actually very easy to do in this version. So I thought I might just share this, for those who would like to accomplish the same:
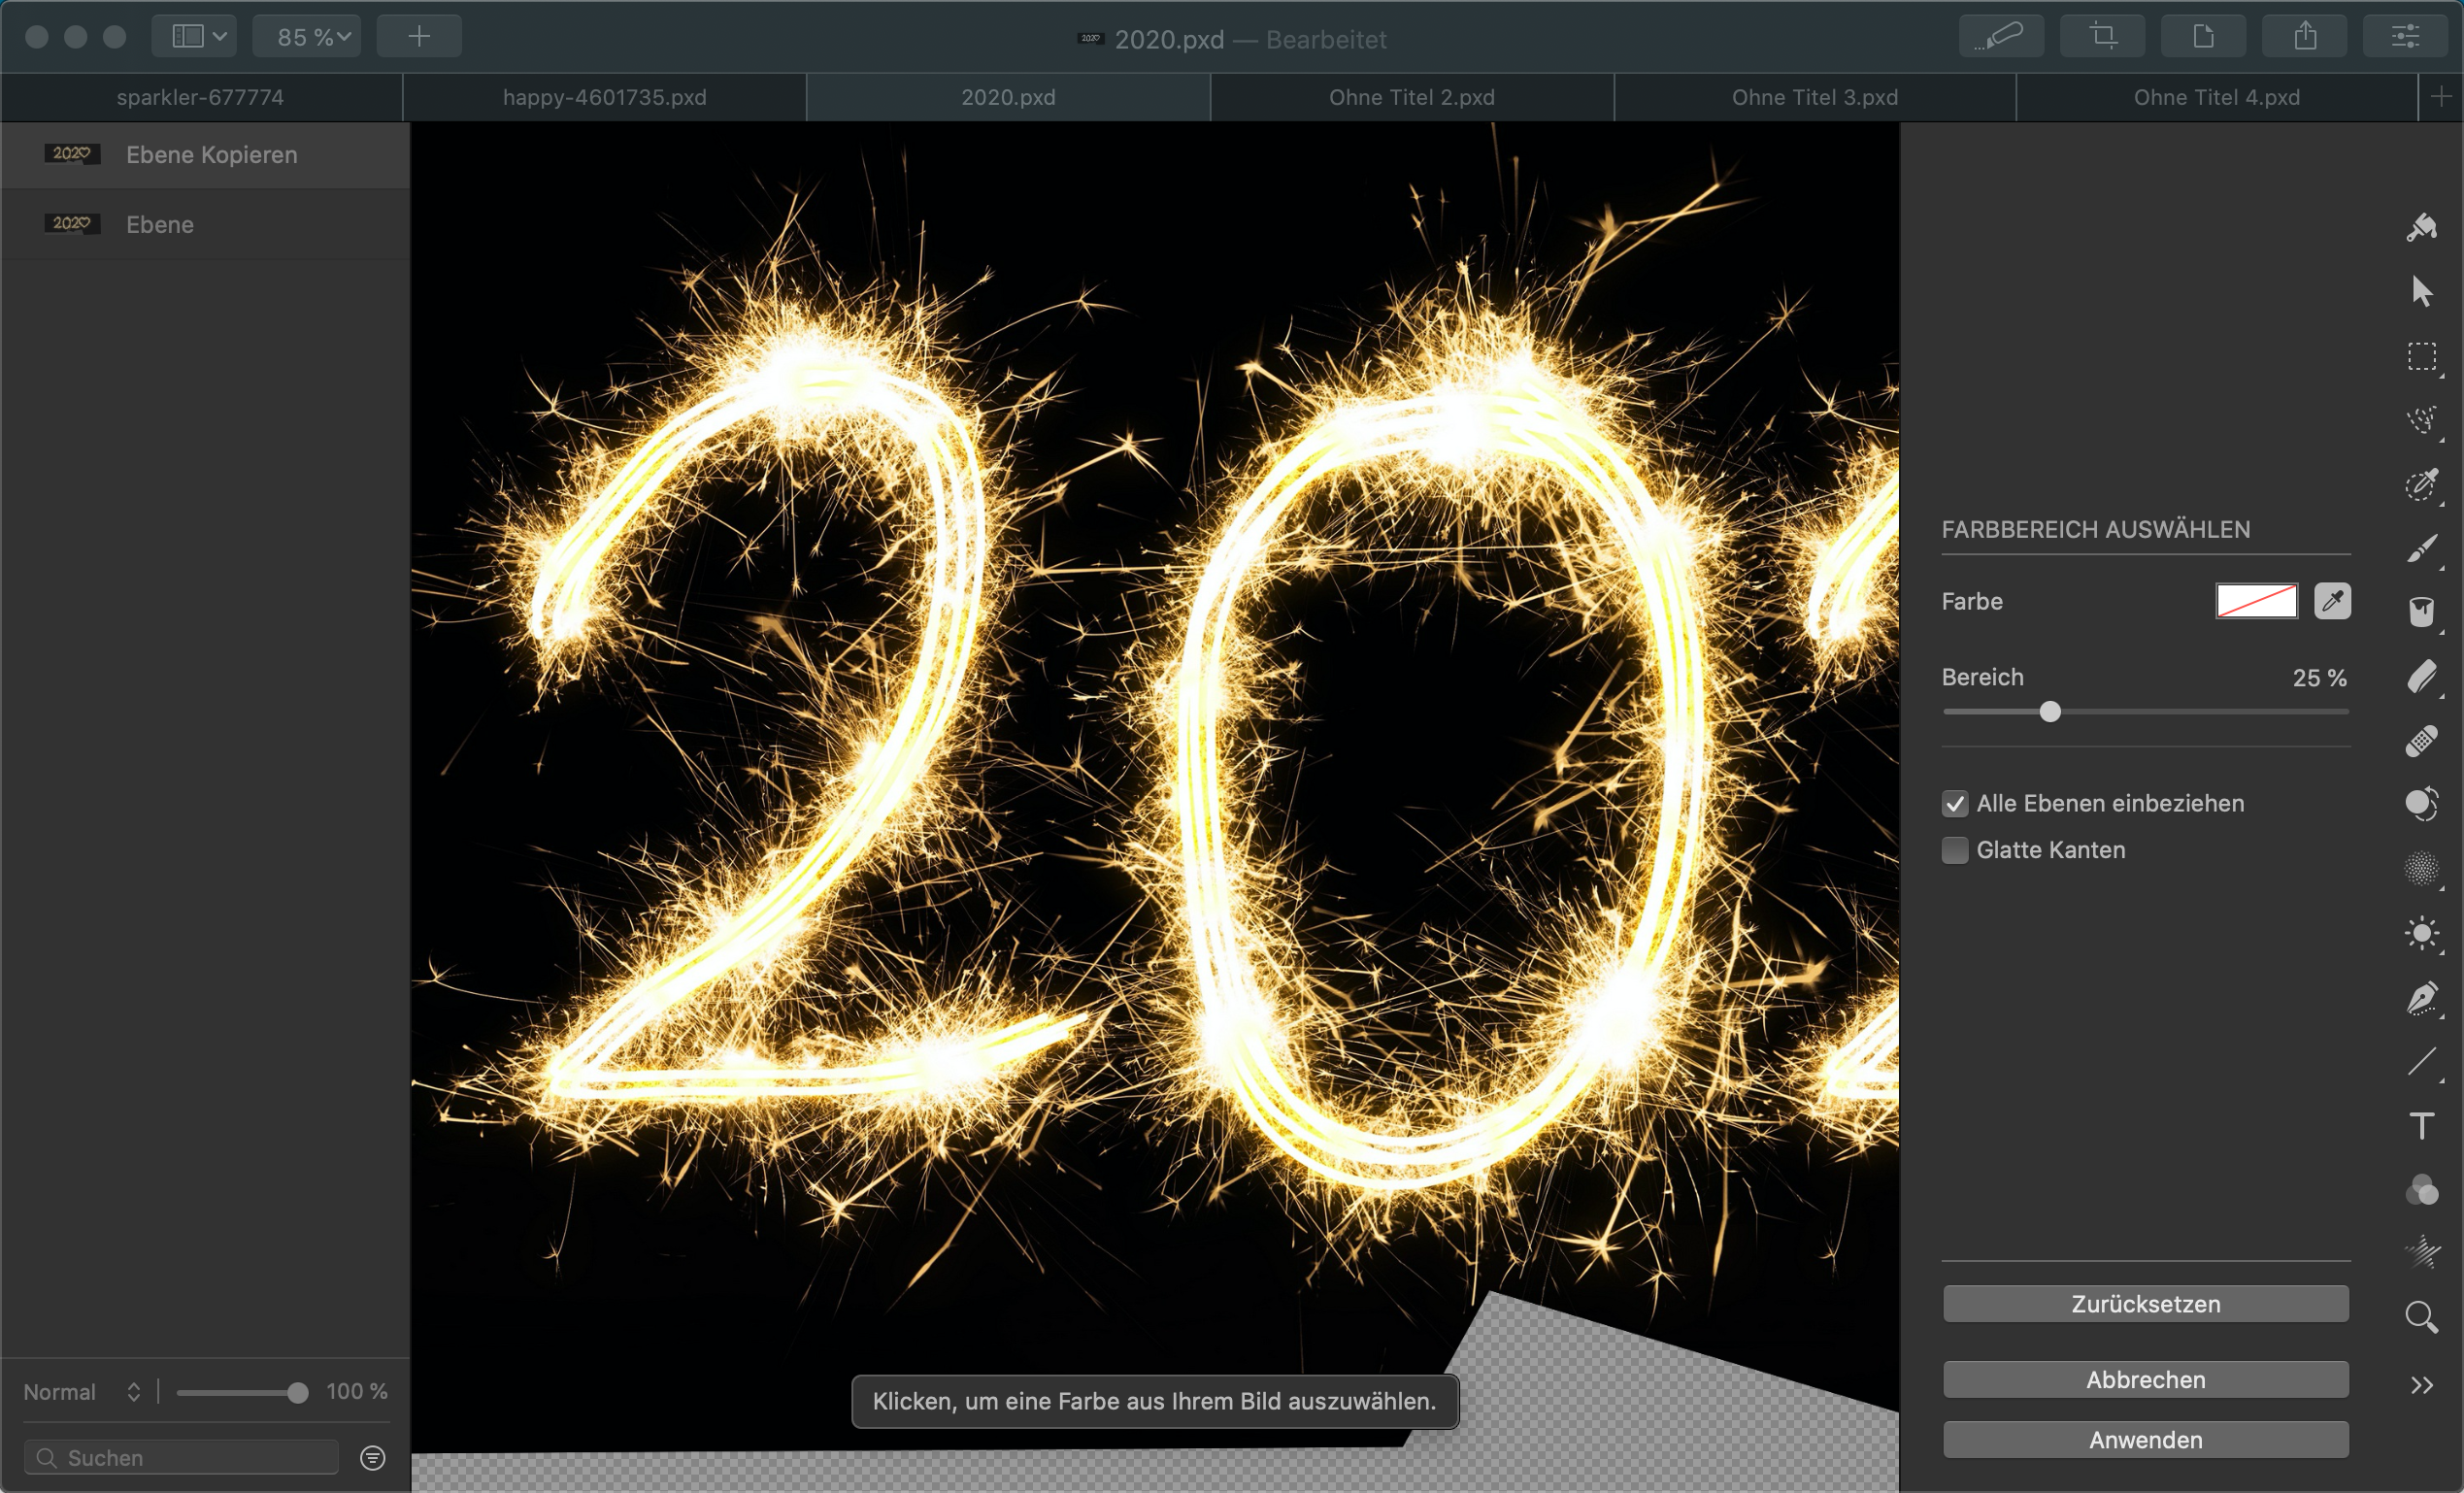
In Pixelmator Pro you can simply use "select color range" for this. You can reach it via the vertical tool bar on the right hand side of the applications window. The 5th tool from the top is the icon for "quick selection".
You can click on the little arrow in the lower right corner of the icon to switch from "quick selector" to "color selector". From there click the first button in the lower section of the settings pane to get to the "select color range" function.
Alternatively, you can reach this function directly via the main menu: "Tools" --> "Selection" --> "Select color range" (the third-last entry).
You should then see a screen similar to the first picture below. You can choose the color picker or the well to choose the color you want. The range selector will allow you to define a level of tolerance, where 0% is zero tolerance, which means that exactly the color that you chose is selected (i.e. all completely black pixels with RGB 0,0,0).
As you move the range selector around between 0% and 100%, Pixelmator will show you immediately what this would mean for the selection.
If you look at the image in my example, you will see that the complexity is not very far from a Jackson Pollock: I was after the sparkling "2020" to use it in another image, so I wanted to simply "drop" everything that is black.
However, in my case the color range selection revealed, that the "black" in the source image was by far not all black. Most areas were actually RGB 0,1,2, but the closer towards the "2020", the more other variations of "black" come into play. So if I would have gone for RGB 0,1,2 at 0%, I would have gotten a big brownish-black "aura" around the "2020".
After some playing around with different tolerance levels, I got pretty close to what I was looking for at around 25%. At this level I did not have to sacrifice too much of the fine grained sparkle (which is why I did want this image for in the first place), but did not have to live with too much dark areas in the "2020". I also did find that in my particular case I got slightly better results by turning "smooth edges" off (As you can see in the screenshots, I am using the German version, so please note that I translated the items in the application with my "best guess" to what the names could be in the English version, so if in doubt just go for the item in the same place in your version)
Once the selection was done, I copied it with command + C into the clipboard. From there I just pasted it back in as a new image, which gave me this:
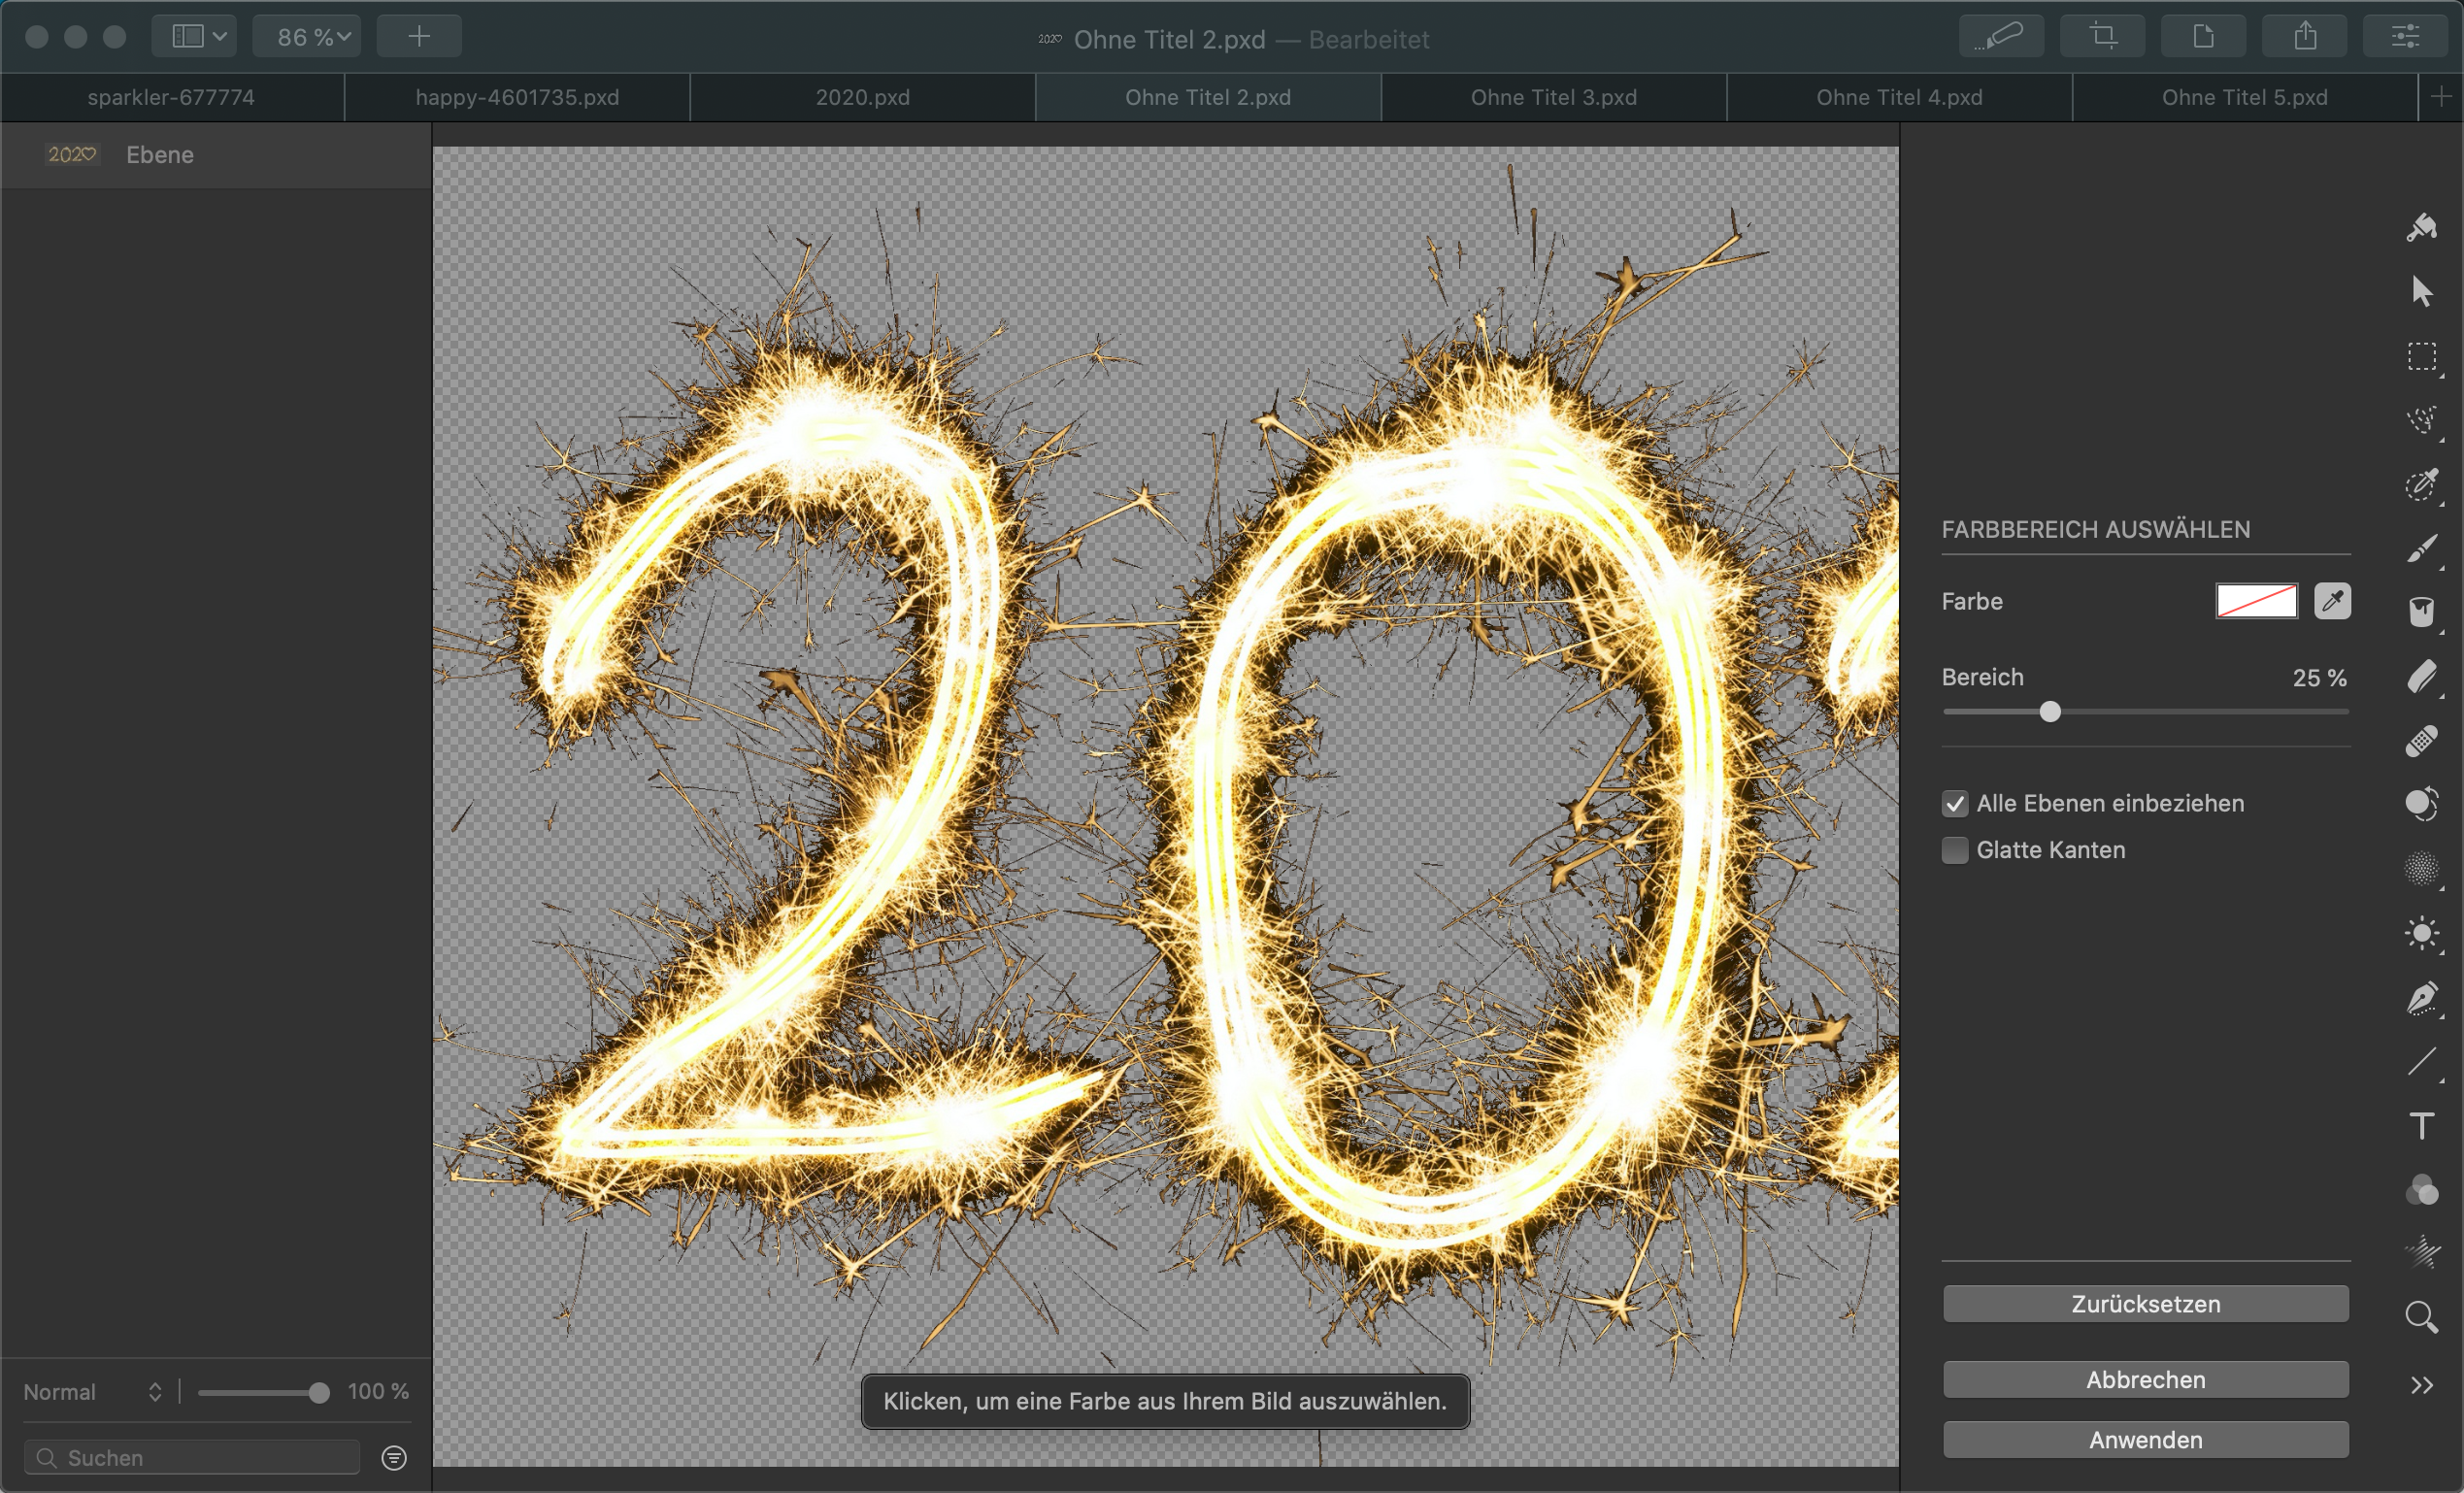
Voilá!
Of course I could have taken the "purist approach" and go color-by-color starting from the darker tones, but I decided that it won't be worth the effort. I think I will start with this outcome, which I can now treat as an object (or layer, more precisely) and play around with the color adjustment to brighten it up until I am satisfied with the end result.
Hope this helps someone out there. Have fun!
Best Regards,
MadKraut
I had the same question as Bill, but I am using Pixelmator Pro (Version 1.5.4 "Avalon") and just like Bill, I didn't even know where to start with Stef's suggested methods 1 or 2, especially because I am using the later version of the software.
I refused to believe that such a great app as Pixelmator does not have an easy way to do this, so I did poke around a little bit and found out that it is actually very easy to do in this version. So I thought I might just share this, for those who would like to accomplish the same:
In Pixelmator Pro you can simply use "select color range" for this. You can reach it via the vertical tool bar on the right hand side of the applications window. The 5th tool from the top is the icon for "quick selection".
You can click on the little arrow in the lower right corner of the icon to switch from "quick selector" to "color selector". From there click the first button in the lower section of the settings pane to get to the "select color range" function.
Alternatively, you can reach this function directly via the main menu: "Tools" --> "Selection" --> "Select color range" (the third-last entry).
You should then see a screen similar to the first picture below. You can choose the color picker or the well to choose the color you want. The range selector will allow you to define a level of tolerance, where 0% is zero tolerance, which means that exactly the color that you chose is selected (i.e. all completely black pixels with RGB 0,0,0).
As you move the range selector around between 0% and 100%, Pixelmator will show you immediately what this would mean for the selection.
If you look at the image in my example, you will see that the complexity is not very far from a Jackson Pollock: I was after the sparkling "2020" to use it in another image, so I wanted to simply "drop" everything that is black.
However, in my case the color range selection revealed, that the "black" in the source image was by far not all black. Most areas were actually RGB 0,1,2, but the closer towards the "2020", the more other variations of "black" come into play. So if I would have gone for RGB 0,1,2 at 0%, I would have gotten a big brownish-black "aura" around the "2020".
After some playing around with different tolerance levels, I got pretty close to what I was looking for at around 25%. At this level I did not have to sacrifice too much of the fine grained sparkle (which is why I did want this image for in the first place), but did not have to live with too much dark areas in the "2020". I also did find that in my particular case I got slightly better results by turning "smooth edges" off (As you can see in the screenshots, I am using the German version, so please note that I translated the items in the application with my "best guess" to what the names could be in the English version, so if in doubt just go for the item in the same place in your version

Once the selection was done, I copied it with command + C into the clipboard. From there I just pasted it back in as a new image, which gave me this:

Voilá!
Of course I could have taken the "purist approach" and go color-by-color starting from the darker tones, but I decided that it won't be worth the effort. I think I will start with this outcome, which I can now treat as an object (or layer, more precisely) and play around with the color adjustment to brighten it up until I am satisfied with the end result.
Hope this helps someone out there. Have fun!
Best Regards,
MadKraut

2020-01-09 10:04:10
Thanks for sharing that! A 'remove color' feature is in development, so in the future, just one or two simple steps should be required to achieve this.
2020-05-15 09:46:50
Hi Andrius,
Hope this thread is an okay place to post:
In my case, the methods above do not do what i need, which is to 'transform' a gray value into a transparency value. Is there any way to do this (e.g., with masks) that i am missing?
Best, M.
Hope this thread is an okay place to post:
In my case, the methods above do not do what i need, which is to 'transform' a gray value into a transparency value. Is there any way to do this (e.g., with masks) that i am missing?
Best, M.
2020-05-15 14:33:13
For something like that, you should use the Mask to Alpha effect (possibly in combination with the Invert Colors command, depending on what exactly you need). Are you using the original Pixelmator or Pixelmator Pro?

2021-05-29 08:22:23
I wonder how could I create a transparent text outline that overlaps any other object on another layer (see example of the second 3 over the first one)?
I'm using Pixelmator Pro 2.0.8 Junipero.
Best regards. Thank you!

I'm using Pixelmator Pro 2.0.8 Junipero.
Best regards. Thank you!


2021-06-01 08:14:29
I’d probably use a layer mask here — use the Quick Selection tool to create an outline first, then create a mask from that selection. I could also share some more detailed steps if you'd like.