Hello,
I'm trying to use Pixelmator Pro to create artwork for shirts to be printed on demand by Printify, but I'm really struggling. The biggest problem is that on dark garments, Printify prints a base layer of white for color vibrancy reasons. This base layer is included anywhere there is image data, including pixels that have some level of transparency. Thus, any transparent areas come out quite ugly, including antialiasing. These links explain it in more detail:
https://www.youtube.com/watch?v=J4N7HEjYBSs
https://help.printify.com/hc/en-us/arti ... 3625121681
The simple solution I've gone with is just to avoid transparency in my designs, then work at a high enough resolution to avoid jaggies. However, things are falling apart on me at the edges because Pixelmator is antialiasing everything. For example, I'll create a mask in the shape I want for a silhouette then fill it, but the edge comes out with antialiasing -- with transparent pixels that make my edges look noisy. I'm also having problems when I use the Super Resolution tool to scale up line art images from elsewhere that I'm using as a starting point in some cases.
I'm making sure to set options like "softness" at zero, but that doesn't seem to be helping.
The only solution I've found is to use the pixel paint tool at the 1px size and manually clean up the edges. But this is super impractical on an image with millions of pixels.
Any suggestions on how to deal with this more efficiently?
Designs for Printify
2024-01-01 01:11:17
2024-01-06 19:11:33
I'm interested in the same thing. Here are a few experiments I tried:
I did a quick experiment with a "Black" fading to "White".

Steps below to get a non-anti-aliased edge.
1. Apply the "Dot Screen" Effect width 15px, Sharpness 70%
2. Apply the "Threshold" Effect about 50%
This creates an edge that is recommended by Printify.
Last step is to apply a Color Adjustment to remove background color
3. Convert into Pixels
4. Apply the "Remove Color" under Color Adjustments with Color="White", Range=17, Luminance Range=50, intensity=100
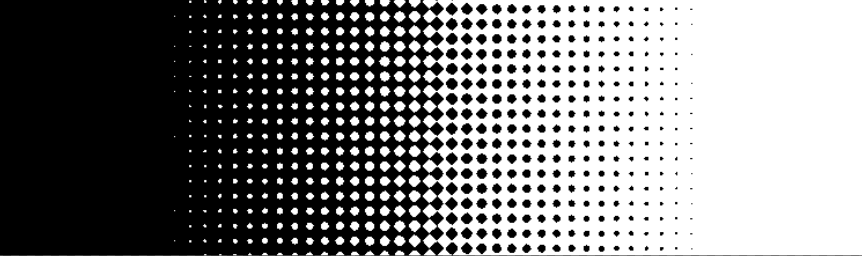
You end up with something that looks like this:

I did a quick experiment with a "Black" fading to "White".

Steps below to get a non-anti-aliased edge.
1. Apply the "Dot Screen" Effect width 15px, Sharpness 70%
2. Apply the "Threshold" Effect about 50%
This creates an edge that is recommended by Printify.

Last step is to apply a Color Adjustment to remove background color
3. Convert into Pixels
4. Apply the "Remove Color" under Color Adjustments with Color="White", Range=17, Luminance Range=50, intensity=100
You end up with something that looks like this:
