Table of Contents
Save, share, and export
After you’re finished editing a photo, save it by tapping Done in the top-right corner of the screen or, if you're editing from Photos, swipe left or right to edit the next photo. All the edits and adjustment settings are saved to a photo and remain editable, so you can come back and make some additional changes anytime you want.
If you’re looking to save a copy of your edited image to Photos, save it to a particular file format or change its dimensions, tap ![]() in the toolbar to find the Share and Export options.
in the toolbar to find the Share and Export options.
Save the edited photos
Once you're finished editing your image, tap Done
 to close it and save edits. In the Photos browser, you can also use the filmstrip to immediately pick a next photo to edit.
Tap Modify to confirm if you're editing from Photos.
When editing nondestructively, after modifying a photo, all the Color Adjustment settings, repairs, and other edits will remain editable and you'll be able to tweak them whenever you open the photo. You'll find the photos containing nondestructive edits marked with ![]() badge.
badge.
In case you're editing destructively, keep in mind that all the Color Adjustment settings, repair, and other edits will be merged once you modify the photo. Photos without any nondestructive edits will be marked with ![]() badge.
badge.
Important: When destructively editing photos from locations other than Photos (the Files app, or iCloud), make sure you're editing the duplicate of a photo if you still would like to keep the original untouched. Pictures edited from the Photos app can still be restored by reverting them to the original.
Share photos
Tap
 in the toolbar at the top of the screen.
Tap Share.
Choose how you want to share a photo. You can AirDrop it, send it via iMessage or email, save it to a folder on your device or to your Photos library, copy, print it, and more.
Note: When sharing this way, a JPEG copy of the photo is exported. Any edits in these JPEGs are merged and cannot be reverted.
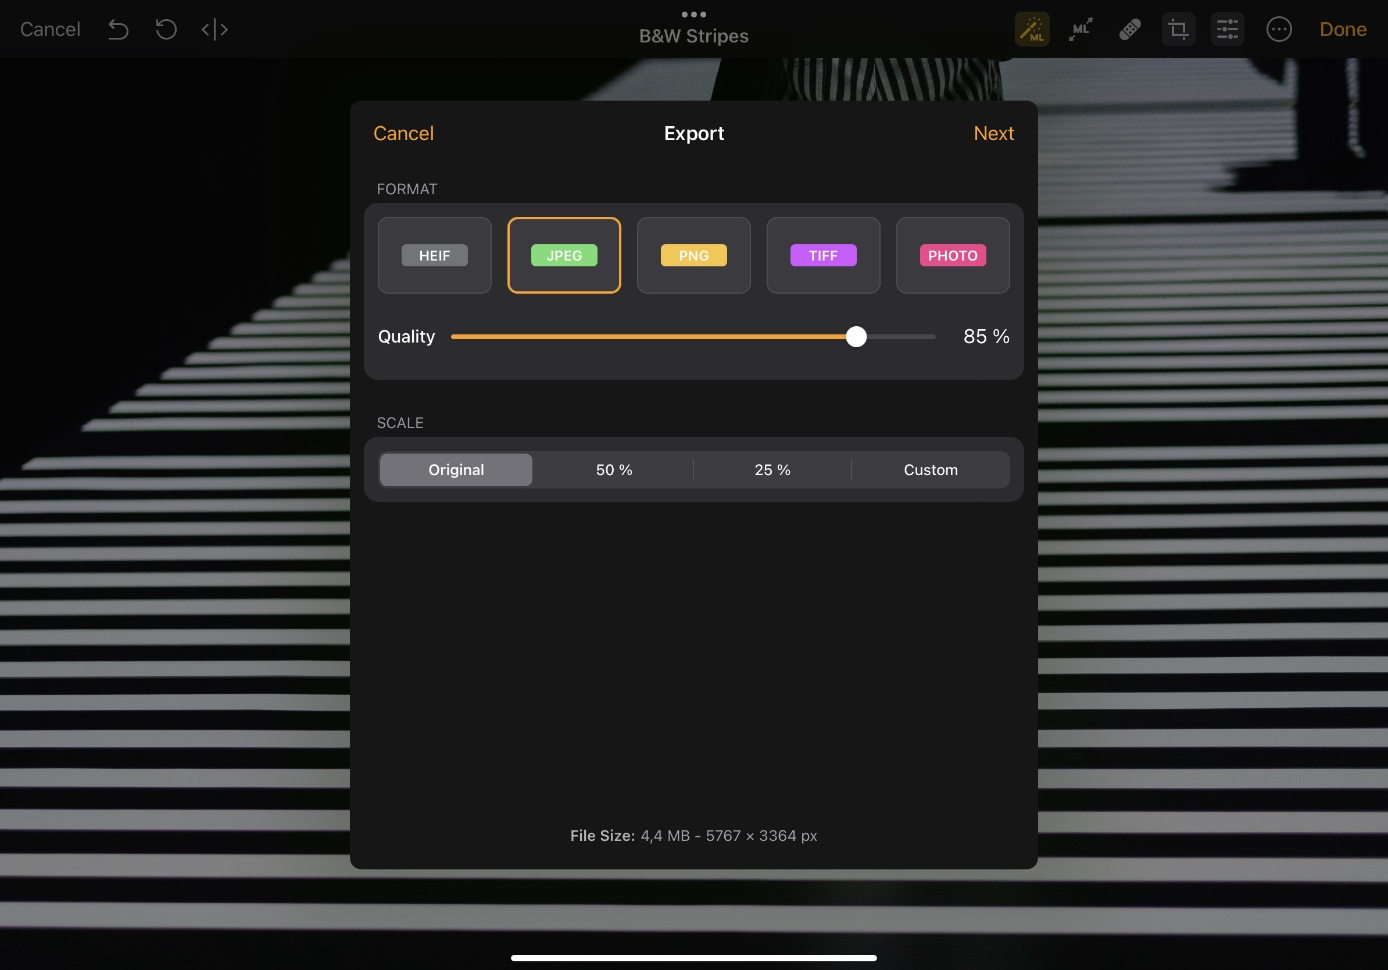
Export photos
Tap
in the toolbar at the top of the screen.Tap Export.
Choose the file format you want to use:
- JPEG. This is a file format that uses something called lossy compression. The downside to lossy compression is that some of the image information is usually lost when an image is converted to JPEG. Since JPEG produces considerably small files that take up less space and load up quicker, they're great to use on the web.
- HEIF. Otherwise known as High Efficiency Image Format, HEIF is also a lossy file format that offers high levels of compression but a minimum reduction in quality. HEIF is often considered an alternative to JPEG, but overtakes this commonly used format by producing files half the size of JPEGs.
Note: In the Export menu, you can additionally control the quality of the HEIF and JPEG files. The lower quality percentage means the image file is more compressed and, consequently, is also smaller in size.
Important: HEIF may not show up as an export option on the devices that do not support this file format. The list of supported devices is available here. - PNG. You can use PNG to export images with lossless compression, because of it, the exported PNG files are usually larger than JPEG or HEIF. PNG is also a file format typically used for saving images with transparency.
- TIFF. TIFF file format produces the largest files but also keeps the highest image quality. Just like PNG, TIFF also supports transparency and is largely used in professional photography and printing.
- PHOTO. PHOTO is a Pixelmator Photo file format. When working nondestructively, every photo you edit in Pixelmator Photo gets paired to a PHOTO where all the color adjustment setting and other edits are saved. This allows to pick up from where you left off editing your image whenever you reopen it.
You can choose to export your photo at 50%, 25% of its original size, or enter a new, custom export size. To export the image in its original size, make sure Original is turned on.
Tap Next and choose what you want to do with your photo. You can use AirDrop to send it directly, share it via iMessage or email, save it to your device, to Photos, copy, or print it.