Table of Contents
Automate tasks in Pixelmator Pro
Pixelmator Pro lets you automate simple, repetitive tasks or execute complex workflows to improve productivity, save time, and reduce the chance of mistakes. There are a few automation options you can go for — using the Shortcuts app, writing commands in AppleScript, or using the Automator app. The below article discusses all of these methods and their possible uses.
Use the Shortcuts app
The Shortcuts app (available on macOS Monterey) offers one of the quickest and easiest ways of processing multiple images at a time using Pixelmator Pro tools and features. Images are processed in the background, so Pixelmator Pro itself doesn't even need to be running.
In the Shortcuts app, you'll find 29 different Pixelmator Pro actions that you can use on their own or in conjunction with actions from other apps to unlock even more workflow possibilities.
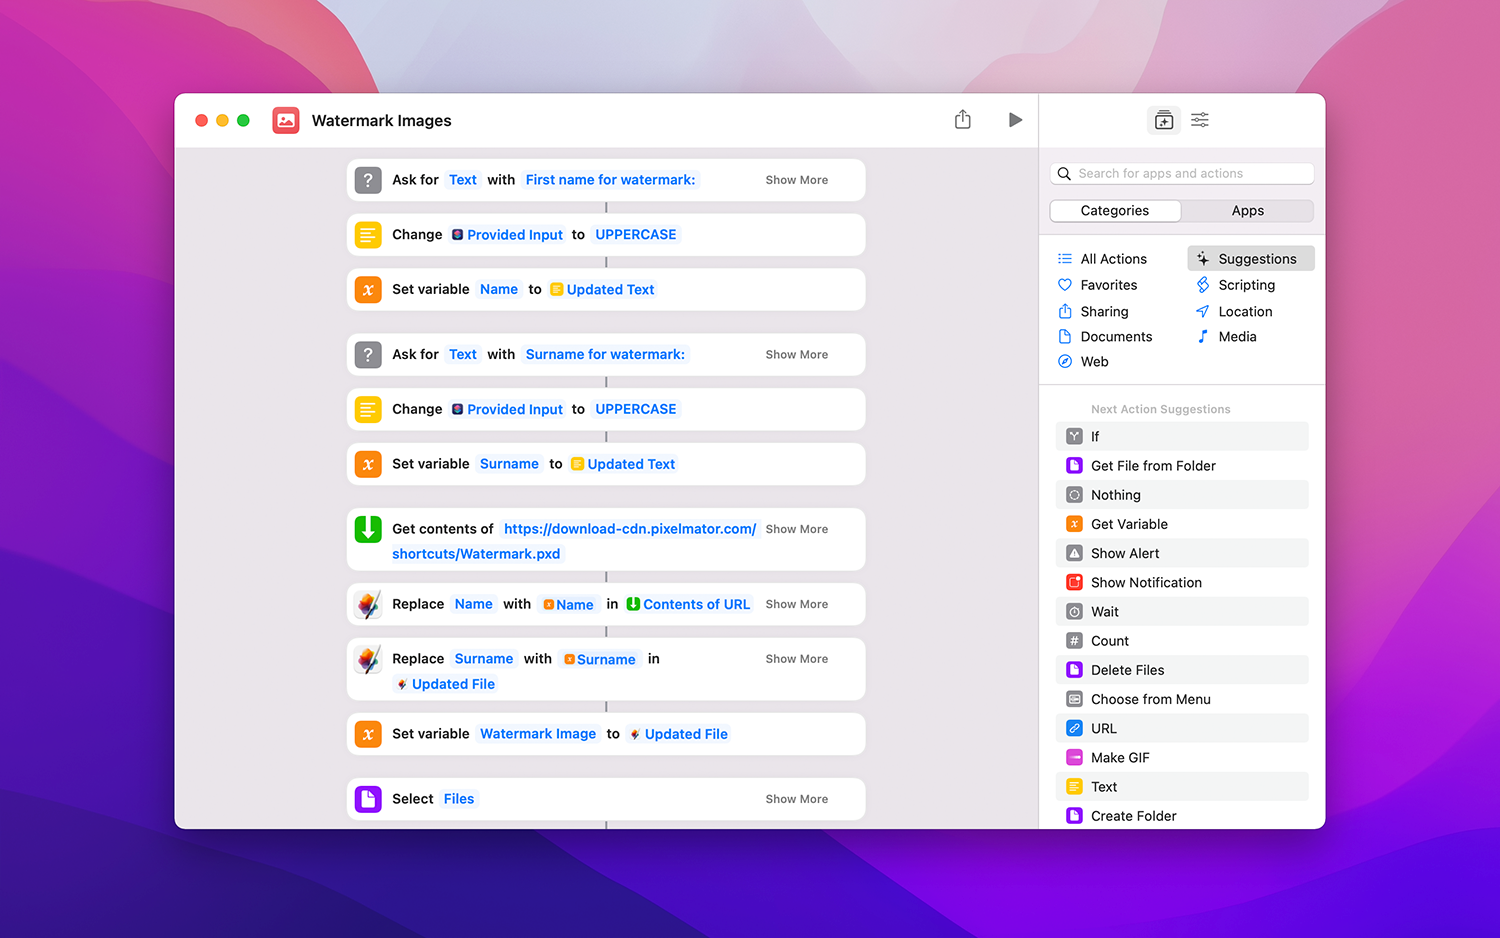
See our tutorial on batch processing images with Shortcuts to learn more about working with the Shortcuts app or check out a collection of sample shortcuts created by the Pixelmator Team for inspiration.
Automate tasks with AppleScript
AppleScript is an Apple-created programming language that lets you automate different tasks in Pixelmator Pro by giving it explicit commands in code form. Tasks from other scriptable apps can also be combined into a workflow, making the automation options virtually unlimited. AppleScript uses an English-like language to tell apps what specific actions need to be performed, so it's pretty easy to write and edit scripts with very little or no programming experience whatsoever — often, you can understand what a particular script does by simply reading it.
The key things you need to write a script for Pixelmator Pro are:
- The Script Editor application. Here is where you write, edit, and compile scripts. There's nothing special you need to do to install the Script Editor — it comes with your Mac.
- AppleScript syntax. Lexical conventions, keywords, characters, symbols, and other language elements that are used to write statements and commands. See Mac Automation Scripting Guide to learn more about scripting syntax.
- Pixelmator Pro scripting dictionary. The dictionary lists all the commands, elements, and properties related to the specific actions, tools, and settings within Pixelmator Pro. To access the Pixelmator Pro scripting dictionary, choose File > Open Dictionary in the Script Editor and choose Pixelmator Pro from the list.
When learning any new programming language, the traditional project to start with is displaying a simple "Hello, world!" message. In Pixelmator Pro, this would include creating a new document, then adding a text layer containing this message.
To write your first "Hello, world!" script:
- Open the Script Editor. If it's not in your Dock, launch it from the Launchpad or try searching for it using Spotlight Search.
- In the Script Editor Open dialog, click New Document or choose File > New (from the File menu at the top of your screen).
- Enter the following script:
  tell application "Pixelmator Pro"
      activate
      set helloWorldDocument to make new document¬
                             with properties {width:5120, height:2880}
      tell helloWorldDocument
          set helloWorldText to make new text layer at the beginning of¬
                             layers with properties {text content:"Hello, world!"}
      end tell
  end tell
4. In the Script Editor toolbar, click Run the Script ▶︎.
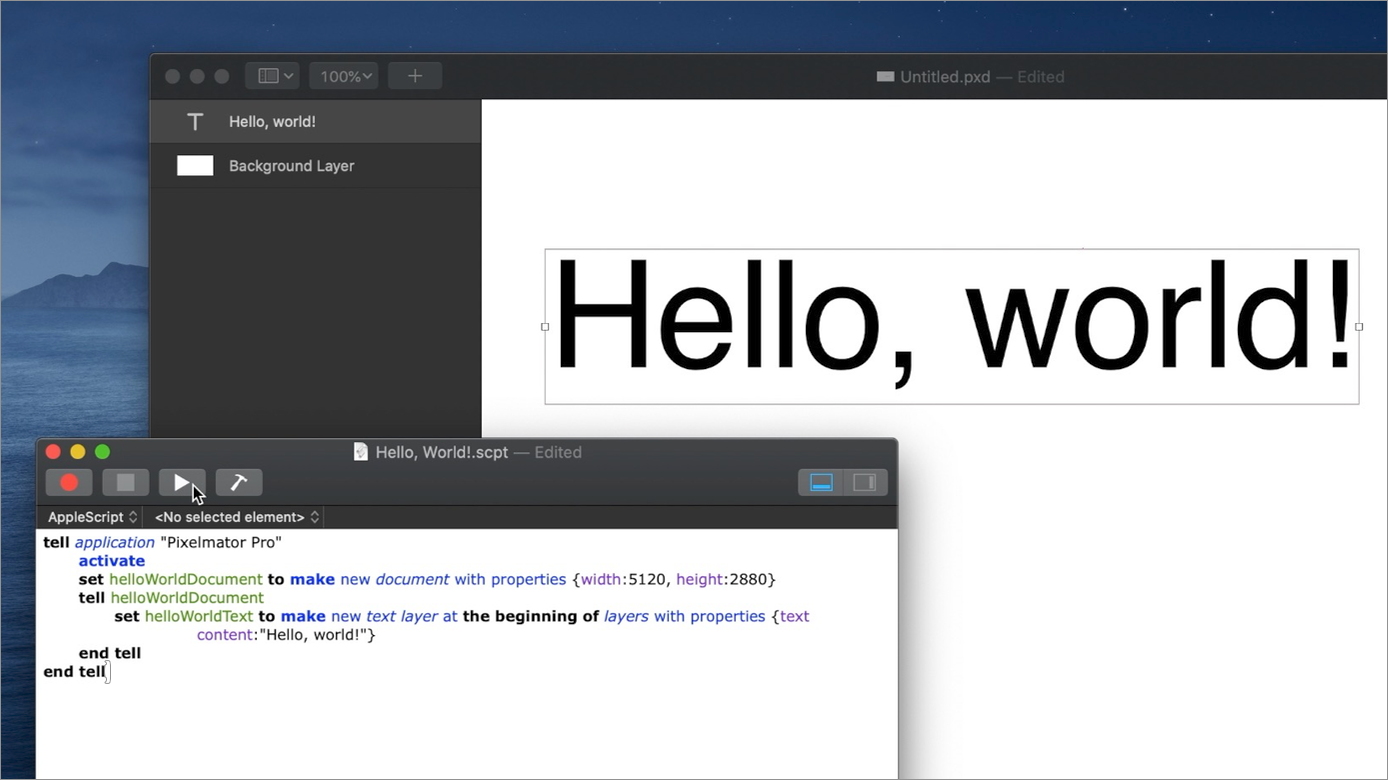
Note: The script above applies the text formatting last used in Pixelmator Pro but you can further customize it by adding additional statements, such as defining the property values of the text size, font, or color.
You can go as simple or as complex as you want with your scripts, adding different new layers, shapes, and effects. For instance, you can download this example script to transform the simple "Hello, world!" script into an eye-catching graphic below:

If you'd like to learn more about scripting, check out our tutorial on advanced automation and scripting with AppleScript.
Batch process images using the Automator app
Automator is a great tool even for complete beginners as it offers a quick and easy approach to automation. It doesn't require any actual coding — you simply pick one or more of the pre-made Pixelmator Pro actions, add them to a workflow, and run it. You can also create Quick Actions, folder actions, or save individual workflows to use in the future.
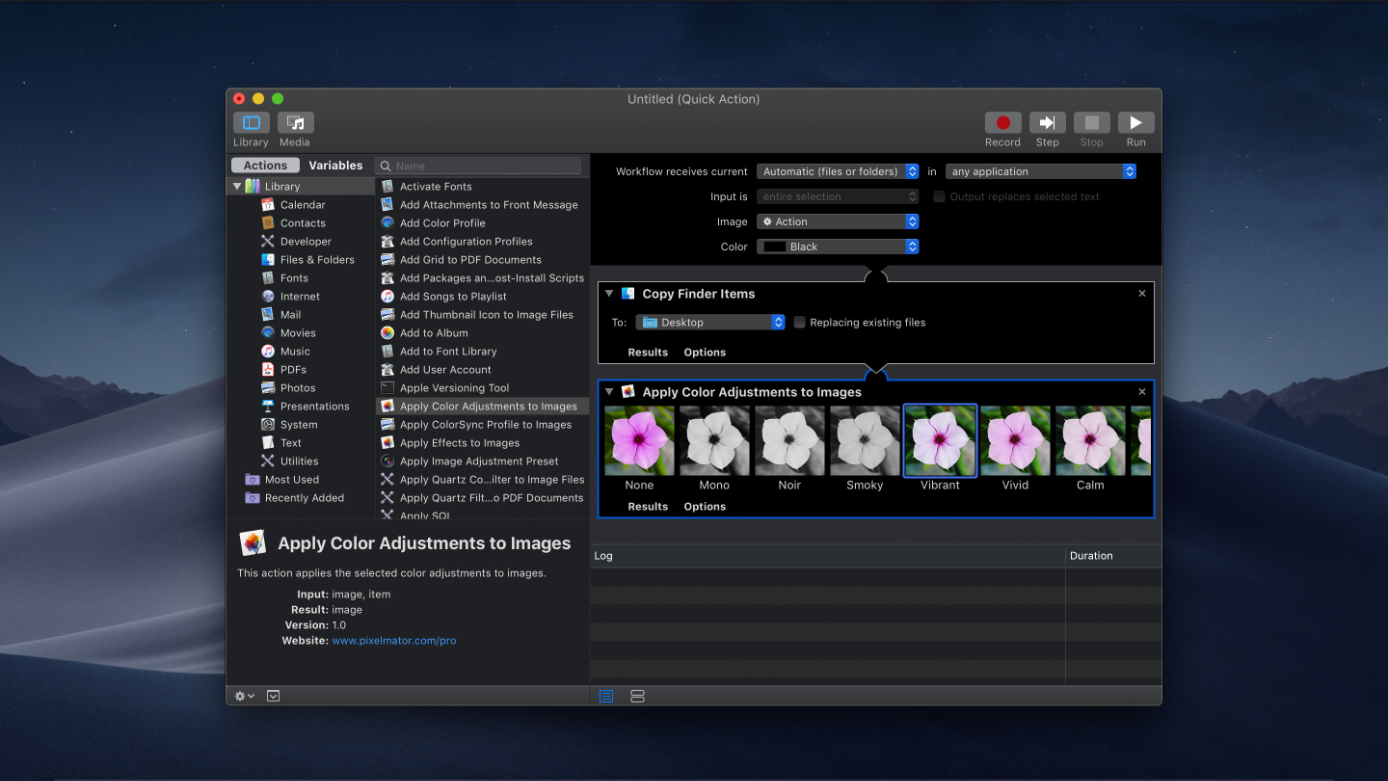
There are currently 9 different Pixelmator Pro actions you can find in Automator:
- Auto White Balance Images: Automatically corrects the white balance of photos using the White Balance feature of Pixelmator Pro.
- Apply Color Adjustments to Images: Applies the selected Pixelmator Pro color adjustment preset to images.
- Change Type of Images: Converts the image file type from one format to another.
- Increase Resolution of Images: Increases the resolution of images by 3 times using the Super Resolution algorithm.
- Trim Images: Deletes transparent or solid colored areas from the edges of images.
- Auto Enhance Image: Automatically enhances photos, balancing colors and improving exposure, using the ML Enhance feature of Pixelmator Pro.
- Apply Effects to Images: Applies the selected Pixelmator Pro effect preset to images.
- Denoise Images: Automatically removes camera noise from images using the Denoise algorithm.
- Scale Images: Resizes the images passed to it, either proportionally or freely.
See our tutorial on batch processing images with Pixelmator Pro to learn more about working with Automator.


