Table of Contents
Adjust lightness, clarity, and texture
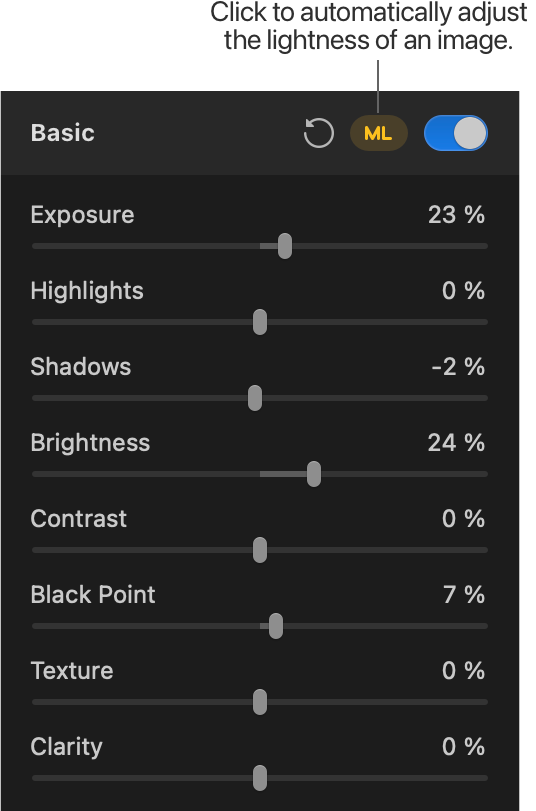
In the Basic adjustments category, you'll find options for adjusting all the base aspects of a photo, including lightness, clarity, and texture. In total, there are 8 different sliders you can manually adjust: exposure, highlights, shadows, brightness, contrast, black point, clarity, and texture. Or, you can also improve the lighting automatically using the machine learning-powered ML adjustment.
Most adjustments in the Basic category are either texture-aware by default (like Clarity and Texture) or have a texture-aware editing mode available. Turning the texture-aware algorithm on for Shadows, Highlights, Exposure, and Brightness adjustments lets you edit images in more powerful ways. Thanks to the algorithm, the adjustments become even more powerful and precise. For example, when adjusting shadows or highlights, only the darkest and brightest areas of an image are affected, while midtones remain untouched.
Adjust the lightness, clarity, and texture of an image
You can adjust the lightness, clarity, and texture of a single layer or, using a color adjustments layer, multiple layers in a composition.
To adjust the currently selected layer, do one of the following:
- Choose Format > Color Adjustments > Basic (from the Format menu at the top of your screen).
- In the Tools sidebar, click
 and turn on Basic.
 - Press on your keyboard and turn on the Basic adjustment.
To white balance multiple layers in a composition using a color adjustments layer (all layers below this layer will be affected):
- Choose Insert > Color Adjustments (from the Insert menu at the top of your screen) and turn on the Basic adjustment in the Tool Options pane.
- Click
 at the top of the
Layers sidebar, choose Color Adjustments, and turn on the Basic adjustment.
at the top of the
Layers sidebar, choose Color Adjustments, and turn on the Basic adjustment. - Press + + on your keyboard, and turn on the Basic adjustment.
Note: If the adjustment isn't visible, you can turn it on from the Customize menu at the bottom of the Color Adjustments pane.
Turn on texture-aware algorithm for Shadows, Highlights, Exposure, and Brightness
Texture-aware algorithm is turned off by default. You can turn it on in a couple of simple ways:
- Click More
 at the top of the Color Adjustments pane and choose Use texture-aware algorithm.
 - Drag Clarity or Texture sliders, or adjust clarity and texture using the Selective Clarity adjustment.
Important: If you turn on the texture-aware algorithm for documents that have been edited using older versions of Shadows, Highlights, Exposure, and Brightness adjustments, your images may look different.
Adjust the exposure of an image
When taking a picture, the amount of exposure chosen normally determines how bright or how dark the final image will turn out. The higher exposure — the brighter the shadows, midtones, and highlights in an image. Lower exposure does the exact opposite — darkens all the tones. The exposure slider lets you adjust these settings after the image has been taken. To make the most of the Exposure adjustment, make sure Texture-Aware Algorithm is turned on when adjusting images.
- Drag the Exposure slider to the right to make the image brighter, or to the left to make it darker. Press and hold the key before dragging if you’d like to extend the range of the Exposure slider beyond 200%. You can also enter a percentage value from –400% to 400%.
Show Original: Click the Show Original button or press + on your keyboard to see what the image looks like without any color adjustments.
Show Split Comparison: – click the Show Original button, press + on your keyboard, or force click the canvas.
To reset all Color Adjustments, click Reset at the bottom of the Color Adjustments pane.
Adjust the highlights of an image
Using the Highlights slider, you can adjust the brightest areas of an image to bring out hidden detail if a photo was shot with strong backlighting or the subject was too close to the camera flash. To make the most of the Highlights adjustment, make sure Texture-Aware Algorithm is turned on when adjusting images. The powerful algorithm lets you recover even more detail from very bright areas of an image, and makes the adjustment even more precise, bringing out textures only in the highlights of an image without affecting brighter areas in the rest of the image.
- Drag the Highlights slider to the right to make the highlights brighter, or to the left to make them darker. You can also enter a percentage value from –100% to 100%.
Show Original: Click the Show Original button or press + on your keyboard to see what the image looks like without any color adjustments.
Show Split Comparison: – click the Show Original button, press + on your keyboard, or force click the canvas.
To reset all Color Adjustments, click Reset at the bottom of the Color Adjustments pane.
Adjust the shadows of an image
Using the Shadows slider you can adjust the darkest areas of an image to bring out the hidden detail or increase contrast in the shadows. To make the most of the Shadows adjustment, make sure Texture-Aware Algorithm is turned on when adjusting images. The powerful algorithm lets you recover even more detail from very dark areas of an image, and makes the adjustment even more precise, bringing out details only in the darkest areas of an image, without washing out shadows or darkening midtone areas of an image.
- Drag the Shadows slider to the right to make the highlights brighter, or to the left to make them darker. You can also enter a percentage value from –100% to 100%.
Show Original: Click the Show Original button or press + on your keyboard to see what the image looks like without any color adjustments.
Show Split Comparison: – click the Show Original button, press + on your keyboard, or force click the canvas.
To reset all Color Adjustments, click Reset at the bottom of the Color Adjustments pane.
Adjust the brightness of an image
Using the Brightness slider you can adjust the brightness of an image to make it lighter or darker. When adjusting brightness, the most noticeable changes happen in the midtones rather than the shadows or highlights. To make the most of the Brightness adjustment, make sure Texture-Aware Algorithm is turned on when adjusting images.
- Drag the Brightness slider to the right to make the image brighter, or to the left to make it darker. Press and hold the key before dragging if you’d like to extend the range of the Brightness slider beyond 100%. You can also enter a percentage value from –200% to 200%.
Show Original: Click the Show Original button or press + on your keyboard to see what the image looks like without any color adjustments.
Show Split Comparison: – click the Show Original button, press + on your keyboard, or force click the canvas.
To reset all Color Adjustments, click Reset at the bottom of the Color Adjustments pane.
Adjust the contrast of an image
Using the Contrast slider you can adjust the contrast of an image. Increasing contrast makes the highlights brighter and the shadows darker, and expands the tonal range of an image. Decreasing contrast darkens the highlights and lightens the shadows.
- Drag the Contrast slider to the right to make the image brighter, or to the left to make it darker. Press and hold the key before dragging if you’d like to extend the range of the Contrast slider beyond 100%. You can also enter a percentage value from –200% to 200%.
Show Original: Click the Show Original button or press + on your keyboard to see what the image looks like without any color adjustments.
Show Split Comparison: – click the Show Original button, press + on your keyboard, or force click the canvas.
To reset all Color Adjustments, click Reset at the bottom of the Color Adjustments pane.
Adjust the black point of an image
Using the Black Point slider you can increase or decrease the tonal range of an image by setting which color should be pure black.
- Drag the Black Point slider to the right to set a lighter part of your current image as the black point (thereby making the darkest areas darker), or to the left to set a darker area of your current image as the black point (thereby making the darkest areas lighter). Press and hold the key before dragging if you’d like to extend the range of the Black Point slider beyond 100%. You can also enter a percentage value from –200% to 200%.
Show Original: Click the Show Original button or press + on your keyboard to see what the image looks like without any color adjustments.
Show Split Comparison: – click the Show Original button, press + on your keyboard, or force click the canvas.
To reset all Color Adjustments, click Reset at the bottom of the Color Adjustments pane.
Adjust the clarity of an image
Clarity is one of the most basic, yet essential adjustments in image editing. You typically use Clarity to subtly enhance image brightness and colors, making the image look overall sharper and clearer. By reducing clarity, you can also create an opposite effect and make the image smoother.
- Drag the Clarity slider to the right to make the image clearer, or to the left to make it smoother. You can also enter a percentage value from –100% to 100%.
Show Original: Click the Show Original button or press + on your keyboard to see what the image looks like without any color adjustments.
Show Split Comparison: – click the Show Original button, press + on your keyboard, or force click the canvas.
To reset all Color Adjustments, click Reset at the bottom of the Color Adjustments pane.
Adjust the texture of an image
Texture lets you subtly add contrast to images, especially the edges of objects, making textures pop. Alternatively, you can reduce texture to smooth out the image.
- Drag the Texture slider to the right to add more texture, or to the left to make the image smoother. You can also enter a percentage value from -100% to 100%.
Show Original: Click the Show Original button or press + on your keyboard to see what the image looks like without any color adjustments.
Show Split Comparison: – click the Show Original button, press + on your keyboard, or force click the canvas.
To reset all Color Adjustments, click Reset at the bottom of the Color Adjustments pane.
Automatically adjust the lightness in an image
The machine learning-powered Basic adjustment improves the lighting in your image automatically. Click ML in the Tool Options pane next to the Basic adjustment to apply it.
Show Original: Click the Show Original button or press + on your keyboard to see what the image looks like without any color adjustments.
Show Split Comparison: – click the Show Original button, press + on your keyboard, or force click the canvas.
To reset all Color Adjustments, click Reset at the bottom of the Color Adjustments pane.


