Table of Contents
Adjust individual colors in an image
Using the Selective Color adjustment, you can adjust the hue, saturation, and brightness of a precise color range in an image without affecting any other colors. The Selective Color adjustment features 8 individual color ranges — reds, oranges, yellows, greens, cyans, blues, violets, and magentas — divided according to the color spectrum. Above each color range, you’ll see a handy histogram that shows you just how much of that particular color is in your image.
Selectively adjust colors in an image
The Selective Color adjustment can be applied directly to a single layer or, using a color adjustments layer, to multiple layers in a composition.
To edit the currently selected layer, do one of the following:
- Choose Format > Color Adjustments > Selective Color (from the Format menu at the top of your screen).
- In the Tools sidebar, click
 and turn on the Selective Color adjustment.
 - Press on your keyboard and turn on the Selective Color adjustment.
To edit multiple layers in a composition using a color adjustments layer (all layers below this layer will be affected):
- Choose Insert > Color Adjustments (from the Insert menu at the top of your screen) and turn on the Selective Color adjustment in the Tool Options pane.
- Click
 at the top of the
Layers sidebar, choose Color Adjustments, and turn on the Selective Color adjustment.
at the top of the
Layers sidebar, choose Color Adjustments, and turn on the Selective Color adjustment. - Press + + on your keyboard, and turn on the Selective Color adjustment.
Note: If the adjustment isn't visible, you can turn it on from the Customize menu at the bottom of the Color Adjustments pane.
Make adjustments to precise colors in an image
Click to select one of the color ranges in the Selective Color adjustment.
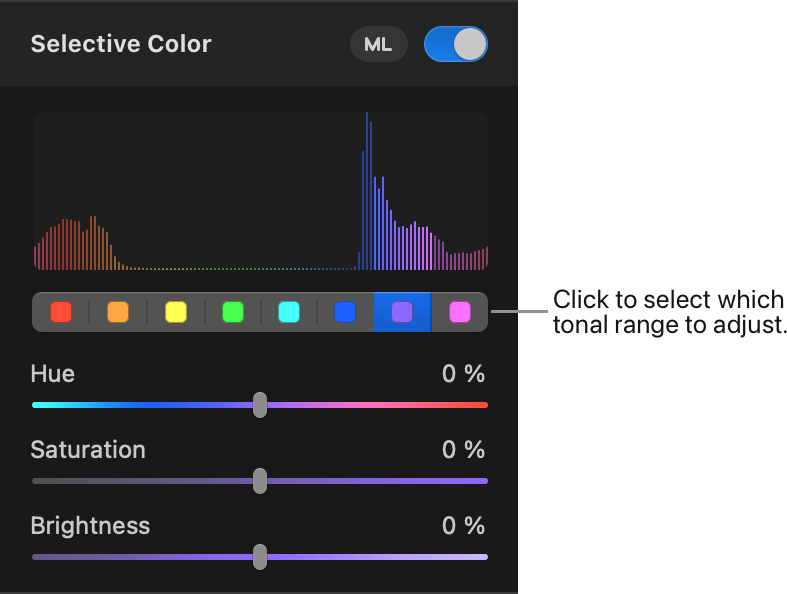
Drag the sliders in the Selective Color adjustment to make adjustments to your selected color range.
Hue: Drag the Hue slider to shift the hue of the colors in the selected color range towards a neighboring color range. Press and hold the key before dragging if you’d like to extend the range of the Hue slider beyond 100%. You can also enter a percentage value from –400% to 400%.
Saturation: Drag the Saturation slider to the right to make the colors in the selected color range more intense, or to the left to make them less intense.
Brightness: Drag the Brightness slider to the right to make the colors in the selected color range brighter, or to the left to make them darker. Press and hold the key before dragging if you’d like to extend the range of the Brightness slider beyond 100%. You can also enter a percentage value from –200% to 200%.
Show Original: Click the Show Original button or press + on your keyboard to see what the image looks like without any color adjustments.
Show Split Comparison: – click the Show Original button, press + on your keyboard, or force click the canvas.
To reset all Color Adjustments, click Reset at the bottom of the Color Adjustments pane.
Automatically enhance individual colors in an image
The ML adjustment improves individual color ranges in your image automatically using a machine learning algorithm trained on millions of professional images.
- Click ML next to the Selective Color adjustment to automatically improve image colors.

Show Original: Click the Show Original button or press + on your keyboard to see what the image looks like without any color adjustments.
Show Split Comparison: – click the Show Original button, press + on your keyboard, or force click the canvas.
To reset all Color Adjustments, click Reset at the bottom of the Color Adjustments pane.


